


Buy me a Coffee – Donation
Help me to run this site and continue testing new lenses and products with a small donation
$3.00

Offrez moi un café – Donation
Une petite donation de votre part m’aidera à maintenir ce site et à continuer à vous proposez des tests d’objectifs
€3.00
1 Introduction
This article is
- a user guide / manual /
- a detailed walkthrough to all functionalities and
- a test/review of my own experience in using the YoloBox Pro
It will be updated each time there are new functionalities added to the product via firmware
1.1 What is a Video Live streaming Switcher
A Video Live streaming switcher is a box that allows to use different video + audio sources and easily switch or combine them with or without some additional effects into a output video stream that can be transmitted live on a streaming platform like Youtube live or Facebook Live
1.2 What are the main players in the market / Les principaux acteurs du marché
The main players in the market are
- Blackmagic with its Atem Mini line up. : Mini, Mini Extreme, Extreme ISO….
- Roland eg. with its Roland V-1 HD
Those box are specialised in the video mixing and do not have control screen & entry levels models do not have live streaming capabilities , they need to be combine with other tools / software and computers


Other new players in the market are
- YoloLiv with its YoloBox & YoloBox Pro
- Atomos AtomX CAST for Ninja V (using Atomos Ninja V as a monitoring screen but no live streaming
- FeelWorld LIVE PRO L1 Multicamera Video Switcher with 4 x HDMI Inputs & USB Streaming

AtomX Cast + Atomos Ninja V 
AtomX Cast + Atomos Ninja V 
Feelworld 
YoloBox Pro


YoloLiv is the only one combining Video switchers + additional video sources + screen + autonomous based on battery + live streaming in one single box, as such it is a new unique proposal in the market
1.3 What is the YoloBox Pro
1.3.1 Introduction
The YoloBox Pro is combining encoder, switcher, recorder, monitor, in One box
- Switch up to 6 video sources
- Multiple entries (3 HDMI, SD card, USB) ,
- Multiples output : 1 HDMI, DP , UVC coming soon (USB Video Class = output as Webcam)
- Audio in (USB , Line in Mic in),
- Audio out for monitoring
- All in one and portable
- No computer/desk workstation required
- Built-in battery – Live On the Go
- Integrated screen
- Super portable, fit into a small bag
- Great ease to operate, touchscreen control
- advanced functions with chroma key, overlays, scoreboard, countdown, multi views (PiP…), etc…
- Highly connected
- Support 4G LTE, Wifi, Ethernet
- Stream to YouTube, Facebook, Twitch or any RTMPs service
1.3.2 Specifications
Dimensions :
- Height: 27 mm
- Width: 129 mm
- Length: 218 mm
- Weight: 750 g

- HDMI IN 1: Video input
- HDMI IN 2: Video input
- HDMI IN 3: Video input
- USB IN: Video input
(Please note in some usb webcams, only video can be captured.) - Ethernet: Connect to Internet by Ethernet cable
- HDMI OUT: Video output
- TYPE-C 3.0: A fully functional interface supports input and output to many destinations that can recognise your YoloBox Pro as a camera source
- AUDIO OUT: Connect with 3.5mm monitor headphones
- MIC IN: Mono, connect to microphone for recording
- LINE IN: Stereo, connect to electric guitar or synthesizer
- TYPE-C: Power connector
- 1/4″ Screw Hole: Mount YoloBox Pro with camera
- Insert SD card as video sources (video & PDF) & for recording
- SIM Card Slot: Insert SIM Card to connect to Internet
- Power Button: Turn on and turn off

Encoded Format
- Video Encoded Format:H.264
- Audio Encoded Format:AAC (44.1k)
- Video Recorded format:MP4
- Audio Input Format:32kHz/44.1kHz/48kHz/16-bit/16kHz
- Video Input Format:1080i/ 720p/ 1080p
- Live Broadcast Resolution:540P/720P/1080P
Video Storage
- Storage Card Type:SD Card
- Storage Card Capacity:exFat, FAT32, NTFS without any capacity limits
Network Connection
- WiFi:2.4Ghz/5Ghz
- 4G Network with a Nano SIM card
Power
- Power Interface:Type C, Quick Charge 3.0 (2.0 compatible) – Output 5V 3A
- Battery Capacity:10000mAh
- Rated Voltage:5V-3A; 9V-2A; 12V-1.5A
Transmission
- Network Protocol:RTMP(S)
1.3.3 What is in the box


The YoloBox Pro
- A Hotshot mount with an Allen key
- USB A to USB C cable (for power)
- USB C to USB C cable (to connect to computer for a future support to use the output of the YoloBox as a webcam thanks to UVC (usb video class)
- A SIM card eject pin
A screen protector
Unfortunately there is no charger delivered with it, and most of my chargers were not compatibles : you really need a QC 3.0 certified charger with USB A of 18W to make it work (I tried at least 5 of them before find one that worked)
1.3.3 Power supply
I recommend you this charger that I bought it works :

Alternatively on the field you could use a big battery bank , some with 25000mAh that will give you plenty of juice for long sessions

1.3.4 Stand
PK1 YB Pro stand (59 euros) is for me a must have if you mainly use your YoloBox Pro on a table , it gives you much better ergonomics, stability (anti slip foot) when you manipulate it
You can find it on eBay for USA
For Europe I bought it from INUX 3D shop


1.3.5 Bag
When transporting the YoloBox Pro on the field , I wanted to have a bag to protect its screen and to store a few cables
After several test on various bags I selected the TiMOVO 8-9″ bag for tablet at 20 euros


2 Use cases
2.1 Introduction
The YoloBox Pro can be used for many situations that requires either
- to stream on the field on social network
- to mix several video sources easily and to share the output either in a conferencing/meeting application like Zoom or just to record it
2.2 Vlogger
As a Vlogger wether you do often Youtube live or Facebook live , on the field r at desk , the YoloBox Pro will help you to have an easy to use video mixer/monitor/encoder that do not requires any computer to work
2.3 Webinars / Training
If you give webinars or training over Zoom / Skype / Teams and need to show various video sources you can use tool like OBS that allow to mix different source pluggeg in to your computer, but that require to use OBS interface on the computer and mouse to change scene , which take quite some attention
The YoloBox Pro with its tactile interface is much more easy to use , you can change scene from a tap on the screen and still use the screen of your computer without requiring a dual screen setup.
The YoloBox Pro will get all video / audio sources as input and its HDMI output will be used together with a a video capture card like the Elgato CamLink 4K or the Elgato HD60+ to serve as a virtual webcam to Zoom / Skype…. (see dedicated chapter)
2.4 Live events : Concerts / Conference / Weddings
With current covid situation , sharing a live event to reach people that can not attend has became very popular. The YoloBox pro is a key enabler for those kind of situations

Wedding 
Church 
Classroom 
Conference 
Concert


2.5 Sports events
Small sports clubs can stream their match live over youtube

2.6 Drone
A live transmission of a bike race, or a nature event will allow you to be the first to share the event from the sky


3 Setup & Functionalities
In the below video you have a full walkthrough of all functionalities and setup
there are further explained in more details in each chapter
3.1 Basic Setup
The basic setup is explained in the below video and each options are detailed in sub chapters
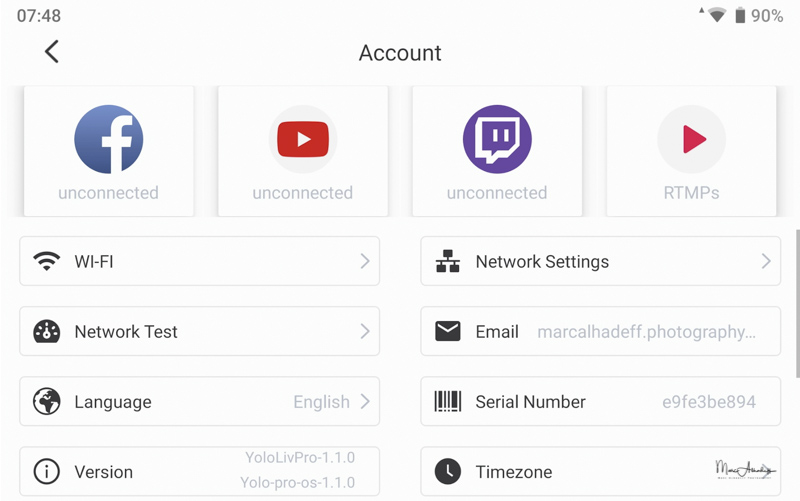
3.1.1 User id
When first starting the YoloBox Pro you need to register via an email address and choose a password to activate it


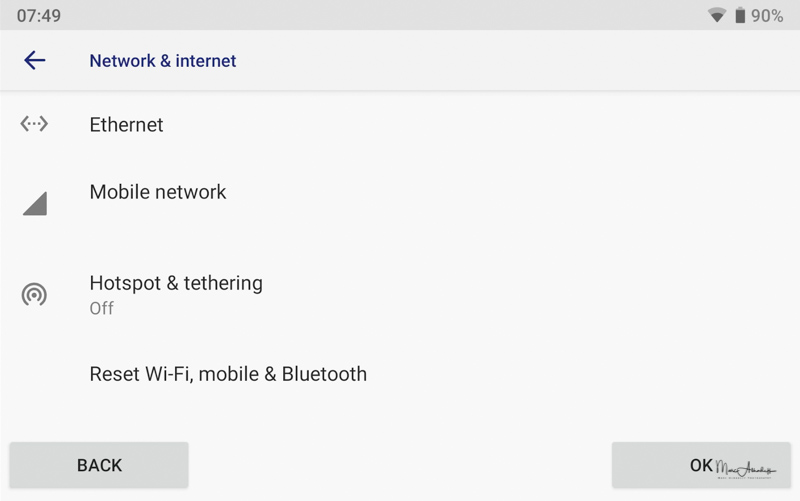
3.1.2 NETWORK
YoloBox Pro offers multiple ways to connect and stream live
the most efficient will be the ethernet to reach the highest quality
Out of the box there is no possibility to aggregate the various network to increase the bandwidth eg combining several wifi network (public+tethered) + 4G
This could come in a new model of the YoloBox or let’s hope via a firmware upgrade
3.1.2.1 ETHERNET
By connecting an ethernet cable between your router and the YoloBox Pro you are sure to get the max speed of your internet connection without perturbation like you could have with a Wifi
3.1.2.2 WIFI
Wifi is the simplest method to connect and if you have a stable connection at home this is the way to go
Also if you have sufficient bandwidth on an event you could use the wifi of the event room. Be aware that if this wifi is shared with others it is not a good idea and you better use a Wifi tethered from your smartphone
3.1.2.3 WIFI TETHERED
is the best way if the wifi of the event room you are in is shared and you have a good 4G/5G connection
3.1.2.4 4G
If you are doing a lot of on location streaming it could be a good idea to buy a specific 4G subscription, for your YoloBox Pro

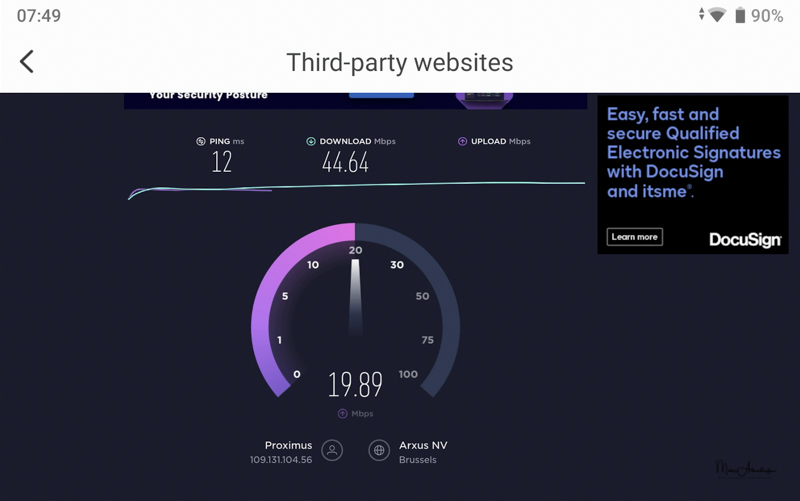
3.1.3 NETWORK TEST
YoloBox Pro allow to test your internet connection , which will be useful to select the quality settings (CQ, CBR, VBR) and bitrate for your live streaming so you don’t get drop frames and have a smooth live
3.1.4 LANGUAGE
Only English and Chinese are currently supported

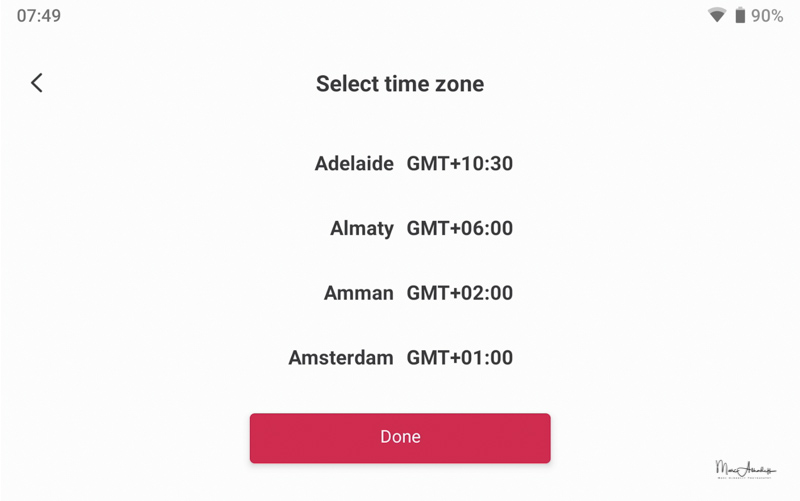
3.1.5 Timezone
You can set up your time zone
3.1.6 Flip screen
The flip screen can be useful if you install the YoloBox on a magic Arm fixed on a tripod with the YoloBox hanging down


3.1.7 Brightness
Brightness of the screen can be adjusted to save the battery on the field

3.2 Streaming platforms setup
You can configure YoloBox for the 3 main streaming platforms : Facebook, Youtube and Twitch and also add any platform compatible with the RTMP protocol (Real Time Messaging Protocol)
see video in 3.1 if you want to see it live
3.2.1 Facebook
For Facebook , just log in to your Facebook account and allow to post on your behalf to public and not only friends
Later when settings up an live event , you will have the choice to do a live on your stream , on a page you manage or a group your manage (see chapter later)


3.2.2 Youtube
To connect to YouTube , just follow the various process steps , allow YoloLiv to publish on your account


3.2.3 Twitch

If you are a gamer , you can setup a connection to twitch and do live twitch streaming
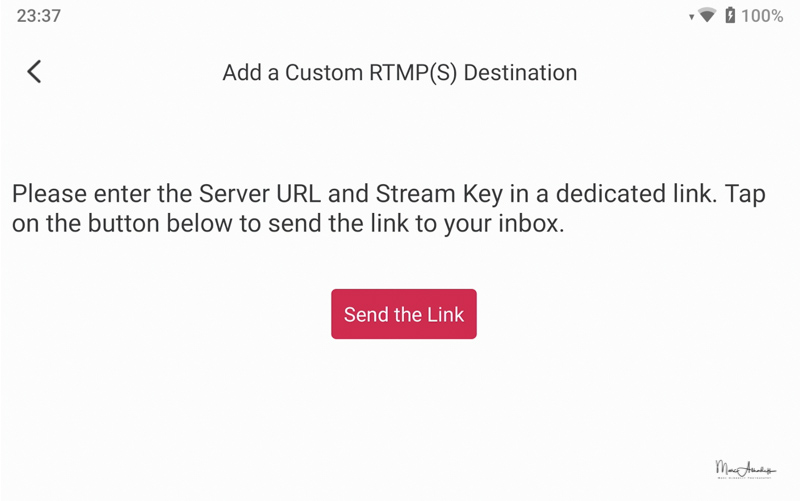
3.2.4 CUSTOM
YoloBox can also stream to other platform using RTMP : Real Time Messaging Protocol
eg. Vimeo platform
To add a custom RTMPS you will receive a link that allow you to enter a stream key


3.3 Preparing your event
3.3.1 Plugging in your Sources
To prepare your event you will need to put together all the images , video sources, audio sources you want to use and mix during your event
This can be
- Live Video sources : cameras , webcam, drone
- Recorded video sources : a PDF or a mp4 video stored on a SD card / usb stick
- A computer screen (connected via HDMI)
- Audio can come from the video sources themselves or microphone , audio mixer via line in
- Pictures for effects, overlays, logo stored on a SD Card


3.3.2 SETTING UP EFFECTS / SCENE
When your sources are connected to the YoloBox you can start to mix them
- Select the various videos sources
- Prepare overlays you will use (eg logo, watermark, banner)
- Prepare mixed views e.g. a Picture in Picture setup showing 2 videos at once
- Manage Comments , Scoreboards…
All these functions are explained in next chapters
3.3.3 PRepare AUDIO
You should decide which audio you can to use
- A unique source of audio or multiple ones : manually selected ro automatically selected when you switch video sources
- Audio from the HDMI source,
- Audio from a specific microphone connected to the YoloBox
- An Audio mixer connected to the line in
For each channel you can set the Audio gain / level . See the dedicate chapter on Audio management
3.3.4 SCHEDULE EVENT
You need to prepare your event by giving a title and if you want a schedule


3.3.5 Monitoring function
A Monitoring function is also possible if you do not want to stream via the YoloBox , it has several purposes
The output of your setup can be used
- Like a webcam as input for a meeting/webinar tool like OBS / Zoom / Teams : the HDMI out of the YoloBox Pro will be used as input of a Video capture card (like the Elgato Camlink 4K) connected via USB to your computer and serving therefore as a “webcam”. A Future upgrade should directly give the webcam function via the USB C port of the YoloBox (Firmware need to be upgrade to use the UVC USB Video Class protocol)
- To record the output of your mix as a video you can further distribute. Note a live stream can also be recorded directly on the YoloBox SD card as a backup or for future reuse

3.4 Settings
There are numerous settings to control the global behavior of the YoloBox (see below video)


3.4.1 Streaming resolution
By clicking on the middle of the left screen you can choose the output resolution : 480P / 720p / 1080p

If bandwidth permits you can use 1080p , in case of low bandwidth you can go as low as 480p
3.4.2 Video Source switching mode
Do you need to single tap or double tap to switch video sources

3.4.3 SD Card Video Switching settings
Control what happens when you switch video sources and you go to a video on SD card : does it restart , does in continue where you left, or does it play whatever source you are

3.4.4 SD Card Management
To view on much space is left, the recording you made on the YoloBox


3.4.5 Program Out
Control what is send to the HDMI Out: the full control panel of the YoloBox (off) or the results of what has been selected with all effects (Program out = on) , when you use the HDMI out as input to eg a program like OBS / Zoom , Program out need to be activated
3.4.6 Video sources Transitions
Various transitions effects when you go from one scene to another one (Fade, Wipe, translation….)


3.4.7 Streaming mode
By default you can only stream to one platform at a time but you can switch to multi platform (eg both Facebook and Youtube at same time)


3.4.8 Video Output mode
Whether to output on the HDMI or on DisplayPort

3.4.9 Encoding settings
You have the option to adjust the quality of the encoding according to the bandwidth of your network
Choose Constant Quality for best results if you have a reliable internet connection
If you see some drop frames during the live transmission decrease the bitrate or switch to VBR (variable bit rate) or lower the output resolution
Option you can adjust are
- Constant quality / CBR / VBR
- Bit rate choices : 4000kpbs is a good start : 2000 would be a min for good quality , 6000 would be ideal
- Fps choice : 25 fps is good for general purpose, increase it for games live streaming
The goal is to select the highest quality possible without having drop frames because too much data go through a network with a too small bandwidth

3.4.10 Recording settings
Recording options to either record on a continuous basis or split every x minutes for more safety in case of isssue


3.5 Video sources
- YoloBox allow to connect up to 3 video sources in HDMI , 1 in USB and 2 from SD card, 1 from a live event, 1 from a PDF file
- On top of this you can create composite video source by mixing 2 existing video sources into a new one
- You can prepare up to 6 video sources In total you have up to 6 Videos that can be selected during the live session


3.5.1 HDMI
3.5.1.1 Cameras
- The most common way to get a live video feed of high quality is to plug in a camera via its HDMI output into the YoloBox HDMI input
- Depending of your model of camera you could use a HDMI to HDMI cable or micro HDMI to HDMI
- Some camera will have settings to display camera info or a clean HDMI output
- The cameras can also be used to transport the audio though the HDMI out so you can attach it a microphone or a wireless audio transmitter


3.5.1.2 Game console
If you want to share you games with a twitch/YouTube community you can share it through the HDMI out of your game console

3.5.1.3 Computers
- If you need to share / explain what you do on the computer you can connect any Mac / windows PC. though an HDMI cable.
- For a MacBook you will need in general an USB C to HDMI adapter


3.5.1.4 iPhone / Smartphone
iPhone / iPad / android smartphone can also be used as a video source
For an iPhone you will need to use the Apple HDMI adapter. Doing so you will see only the screen of the iPhone , which is great to display how to use an application , but if you just want to share the output of the iPhone camera you need to use an application like Filmic Pro and choose “Clean HDMI output” to only transmit through the HDMI the output of the video camera signal

IPhone 
HDMI adapter 
Android


3.5.1.5 wireless hdmi
If your camera are far away , you can use a HDMI wireless transmitter like the Hollyland ones

3.5.1.6 Drone
Most drone controller have an HDMI output, if you link this one to the HDMI in of your YoloBox, you could live stream your drone camera. Check each manufacturer for the possibility to output a clean HDMI signal

3.5.2 USB WeBCAM
Any webcam can also be connecte via USB and you can use them as video sources. Pay attention some models do not transmit well the audio via that type of connection to the YoloBox


3.5.3 SD CARD VIDEO
You can put on a SD card (Fat 32 format, 128Go max) various videos you can use eg
- Intro and closing video
- Recorded Video you will integrate on a PiP setup with a camera on you to comment the video


3.5.4 PDF
If you need to present a powerpoint , you can turn it into a pdf and stored it on the SD card to avoid to need a full computer
The YoloBox allow to go to next/previous page by just clicking on the screen.
Combined with a PiP (Picture in Picture) setup you can have a camera on you in a corner on top of the displayed pdf


3.6 Multiple views
The YoloBox Pro allows to create a scene that mix 2 video sources
This is very useful to present e.g
- PIP (Picture in Picture ) : your computer or a slide show as background and the video of yourself in a corner
- Side by side : when doing interviews with 2 speakers
- Side by Side : debate between 2 people
3.6.1 PIP
The setup is pretty simple choose your main background video source and the secondary one. The secondary video source can be resized and move around anywhere on the main screen surface


3.6.2 SIDE


3.6.3 SPLIT


3.7 Audio sources
3.7.1 Managing Audio sources
The Audio section (3rd icon from the left in the bottom right menu) allow to choose which input source will be transmitted to the live event / HDMI out
By default it is set to automatic and the audio of the video source selected will be played
As you can connect external microphone like a a Lavalier microphone or a Wireless microphone or an audio mixer (Line in or USB in), you may want to force the system to use only that one instead of the one of the video sources selected
For each source you can setup the Audio level
Unfortunately for the moment there is no audio mixer option where you could add several sources at once and change the audio level for each of them
The audio monitoring function is controlling the level of the audio out jack that can be useful to control the audio output


3.7.2 Monitoring
Monitoring the resulting audio is very useful to be sure the right audio source has been selected , to monitor the output volumes.
Any standard earbuds / headphone with jack cable can be used


3.7.3 HDMI sources
The most standard way to get audio is to use the one of your HDMI source. You can connect your microphone to your camera and let the audio going in through the HDMI in

3.7.3 MIC IN
The mic in input accept standard non powered microphone like a Lavallier microphone


3.7.4 LINE IN
The line in can be used eg. with Wireless microphone like the Rode Wireless Go II


3.7.5 USB microphones
Any audio mixer, USB Podcast microphone (eg YetiX) can be used as input audio source


3.7.6 SD CARD VIDEO
You can also use the audio of the video card stored on the SD card : whether it is a full video you can’t to comment on or Intro / closing video with some music

3.8 OVERLAYS
3.8.1 Introduction
Overlays are additional images that will be displayed on top of your video sources
This section is the first option in the lower right menu bar with the layer icon
3 types of overlays can be configured and added to your video sources:
- Image overlays : for logos , special effect
- Lower thirds : for a banner fixed or scrolling
- Countdown timer : useful before your live event start to tell the audience when the event will really starts
Once setup (see below next sections) they can be activated on your video sources : you can define up to 6 overlays than can be activated just by clicking on the overlays preview. Multiple once can be activated at once
The main missing functionality for me is that you can not have one config of activated overlays per video sources
I would like to for one video source a banner is activated and that for another one a logo is activated , without needed to change it manually each time I switch video sources


3.8.2 PREPARE your SOURCES : Logos, watermark, EFFECT, Rolling
All your logos , watermark , images you want to use should be prepared , with max, a full HD resolution, preferably as a png with a transparent background , and stored on your SD Card
3.8.3 Image OVERLAYS
Image overlays are useful to display a watermark , a logo or a special effect , eg a big thumbs up
The selected images can be resized and positioned anywhere in the screen by moving them around with your finger


3.8.4 LOWER THIRDS
The lower thirds overlays is nice to display a banner. Like image overlays they can be placed anywhere in the screen
Various design are possible. Within one design you can change, font, colors
One special design is the rolling caption that display an animated caption


3.8.5 Countdown Timer
The 3rd type of overlays is a countdown timer that is very handy to display a countdown before your event start, as you may want to already start the live streaming 10min before the real events to let everyone connect to the event
Like for the others overlays various design and customisation options are possible


3.9 Chroma Key
The Chroma key function allow to use a green screen to put a specific static or animated background
3.9.1 How to SETUP
On the video source, click on the top right icon representing a person on a rectangle. You will see the Keying switch option appearing. When you activate it the free part will become transparent and you can choose an image (stored on your sd card) as a background


3.9.2 Animated background
Instead of having a fixed image , you could choose to have a video animation behind you
To do this you will need to use the PiP function the main video will be the one on the SD card , the secondary video will be the video source where you have your green screen
You will need to resize your secondary video to get it full screen in the PiP and there you go you have an animated video


3.10 Scoreboards
3.10.1 Scoreboards for SPORTS / DEBATE
The YoloBox Pro allow to add a scoreboards on top of your video source this can be useful for sports events but also for products comparisons

3.10.2 SETUP
There is only one design available but within that design you can customise colors, fonts, add icons
Main options are
- Name of event
- Teams info : name + logo
- Period of the game (optional)
- counter for Team 1 and Team 2
The counter are basic and have only increment of 1 : if you have a tennis game you can’t score by 15 like required. This is maybe an option we will see in a future upgrade


3.10.2.1 Teams
You can customise the teams names , colors and logo

3.10.2.2 TIMING / Countdown
You can setup either a clock or a countdown


3.11 Comments management
3.11.1 Live comments management
During a live event , your viewers may add comments on Facebook or Youtube. You can see those feed of comments directly in the YoloBox in the section 5 of the bottom right menu
The YoloBox allows to display any comments in the feed for a few seconds in the active video source. This is particularly useful for Q&A session to have live interactions with your viewers
Like for the other functions there are several design options : you can customise fonts, color , transparency…


3.11.2 Comments : Layout design


4 In Use
4.1 Introduction
To prepare you streaming event you need to decide / Prepare the following elements
- Do you want to stream or just use it as a monitor/video switcher in combination with a conferencing tool like Zoom
- Decide where you want to stream : Youtube, Facebook : Group ? Pages ? Personal feed
- Setup you video scenes : video & audio sources, overlays, other effects
- Choose quality and bitrate according to bandwidth of your network
- Activate internal recording as a backup
4.2 Setting up Going Live on Facebook / Youtube
If you have Facebook page, are admin or a Facebook group, you can choose to stream on your profile or in a grip or on a page you manage
For YouTube channel you can stream public or unlisted if you want to share your live only with a limited audience


4.3 Participating to Conferene / Meeting / Webinar
4.3.1 OBS Studio
You can use the output of the YoloBox pro as an input for OBS. This allow to have your computer screen free from the clutter of the OBS interface and of the needs to click on OBS option to switch scenes
By using the YoloBox as input , the change of video sources, overlays effects is much smoother and requires less attention than in OBS
To configure it you need to setup the YoloBox output as a webcam into OBS
Currently the team is working on this feature to directly connect the YoloBox via USB as a webcam like the ATEM mini can do , but for the moment you need to use the HDMI output of the YoloBox combined with a Video capture card liker the Elgato Calming 4K or the Elgato HD60+


4.3.2 Zoom

Simillar to OBS, You can use the output of the YoloBox pro as an input for Zoom. This allow to manage different scenes in Zoom and to control it directly from the YTolobox
Previously I was connecting all my sources to the computer , setting up scene in OBS and selecting OBS virtual webcam in Zoom for my webinars
Now I can just use YoloBox connected to Zoom as a virtual webcam
To configure it you need to setup the YoloBox output as a webcam into OBS
Currently the team is working on this feature to directly connect the YoloBox via USB as a webcam like the ATEM mini can do , but for the moment you need to use the HDMI output of the YoloBox combined with a Video capture card liker the Elgato Calming 4K or the Elgato HD60+


4.4 Quality & ease of use
- The YoloBox Pro is providing an excellent user experience both in term of setup a and in term of use during a live session
- You see what you do and there are no different tools to combine and use (eg an Atem Mini + a computer + a monitoring screen)
- Provided you select a bitrate inline with your bandwidth there quality is very good with no drop frames encountered
4.5 Firmware updates
Every times the YoloBox Pro connects to the internet it will check if there is a firmware upgrade
YoloLiv is doing regular upgrades for its box adding new functionalities (e.g Chroma key) and correcting some few bugs


4.6 Missing functionalities
4.6.1 Audio Mixing
Currently you can only have one audio sources at a time either form one of the video sources either from an audio input
having the capability to have several audio sources at once is a must have
- 2 caméras with 2 microphone for an interview of 2 people
- 1 video playing + someone doing comments on a other audio input
4.6.2 SAVED TEMPLATES
Each time you shutdown the YoloBox , you loose the list fo video sources, your PiP setup…
Having the possilbity to save video audio configuration in a template will be a massive time saver
4.6.3 Additional Multiple views
For the moment you can setup 1 Pip + 1 Side + 1 Split
Personnaly I would need to have 3 PiP configured but this is currently impossible
4.6.4 Overlays Management
You can’t set up a selection of overlay per video source
Once you activate 2 overlays they will appear on each video source , you need to deactivate / activate for each video sources on the fly if you want to have different settings
4.6.5 ScorebOard management
You only have increment of 1 for the score. Some sports have increment of 15 like Tennis
4.6.6 SD CARD video management
You can not pause a video when it is selected as a video source
For intro closing video you don’t need that , but if you have a 10 min video that you are commenting you may want to pause the video from time to time.
This would be similar to the PDF functionality where you have button to go to previous or next slide. For video we should have a pause play button
Currently the only option you have is continue the video non stop, pause when switching sources or restart from scratch the n you with video
4.7 Combined with ATEM Mini
4.7.1 Why Combining them
The Atem mini main advantage and drawback is that it focus only on the video audio switching with a panel of button. Setup , live streaming controls are made with a software on a computer, so Atem mini are very good if you have a full team of people for a live event with dedicated people for video, audio, monitoring , live stream controls etc but are less good for “one man do it all” setup
The Standard Atem mini does not provide any streaming capability neither monitoring but is providing audio mixing
So until YoloBox is upgrade with audio mixing capabilities it could be a good idea to combine both by having the Atem output HDMI used as a input source for the YoloBox pro and using the overlays, scoreboard, streaming and monitoring capabilities of the YoloBox Pro as a complement
5 Conclusion
Globally the YoloBox Pro is a fantastic product combining
- Video switcher
- Video encoder
- Streaming and recording capabilities
- Portability (works on battery)
- Ease of use (tactile tablet interface)
- Lot of functionalities. : Multiple views, overlays, chroma key, scoreboard….
- With a very active support team release very frequently new upgrade (once a month end 2021)
No other tool in the market combine all of these elements
the main missing capabilities are
- The audio mix and
- the capabilities to save a setup,
- The output as a webcam on the USB C output
All of this functionalties are being worked on
YoloLiv could also provide a charger for its YoloBox as it is difficult to find a compatible one (cost is 15 euros) and provide a list of compatible accessories (like the stand , a bag for carry it….)
Other functionalities that would be a big plus but that maybe require an hardware upgrade are
- 4K output/recording
- Recording all video/audio sources separately instead of just the final output in case you want to combine them differently in post in a video editing tool
Highly recommended
Leave a Reply