

in Blue English / en noir en Français
- Presentation
- Optical performances / Performances optiques
- Video
- Samples photos / Exemples de photos
- Conclusion
All photos , taken with Sony A7RIII and without post processing are available in full size (42Mpix) in the following Flickr album : Thingyfy Pinhole Pro S
Toutes les photos de l’article, prises avec le Sony A7RIII et sans aucunes retouches sont disponibles en pleine résolution (42Mpix) dans l’album Flickr suivant : Thingyfy Pinhole Pro S
1 Presentation
1.1 Pinhole Photography / Sténopé
Pinhole photography consists of projecting an image through a tiny hole to the sensor, without any lens/glass.
Light from the scene pass through the hole and project an inverted image on the sensor
This optical phenomenon is also known as the camera obscura and known since more than 2000 years and was first used for a real photography in the 1850
La photographie Sténopé (pinhole) consiste à projeter une image via un petit trou sur une surface qui capturera l’image (ex capteur d’appareil photo , film argentique)
La lumière passe par le trou et projète une image inversée sur le capteur
Ce phénomène est aussi connu sous le nom de camera obscura est connu depuis près de 2000 ans et appliqué à la photographie depuis 1850

The pinhole size / taille du trou
The pinhole size has a direct impact on the sharpness of the image , the smaller it is, the sharper it will be. If hole is too large, ray of lights will diverge and image will be blurry.
La taille du trou a un impact direct sur la netteté de l’image, plus petit il est plus nette sera l’image. Si le trou est trop grand les rayons de lumière divergent et l’image est floue


small hole = sharp image bigger hole = blurry image
petit trou= image nette grand trou = image floue
Why then don’t we made the smallest hole possible ?
- When too small we have diffraction due to the wave properties of light : light from each point will tend to spread out giving a blurry image
- A very small hole means , much less light and then F-stop going to the roof and very long exposure time / ISO
The F stop can be computed as F = focal length / size of hole, the focal length being the distance between the hole and the sensor
Pourquoi ne pas donc faire le plus petit trou possible ?
- Si le trou est trop petit on a de la diffraction dues aux phénomènes ondulatoires de la lumière : la lumière de chaque point se disperse et donne une image floue
- Un petit trou signifie que beaucoup moins de lumière pénètre dans la “camera obscura” et donc nécessite une exposition beaucoup plus longue et donc des ISO très élevé . on a une ouverture F très très petite
L’ouverture peut être calculée comme F= focale / taille du trou . La focale étant la distance entre le trou et le plan de projection
Josef Petzval has given a formula to compute the optimal pinhole diameter to optimise sharpness and avoid diffraction: d = 2 x √ (f x λ)
- d = diameter on the pinhole
- f is the focal length = distance between the hole and the sensor
- λ is the wavelength of light , we use commonly 550nm in this formula
e.g. For a distance of 11mm we have an optimal of 0,15mm
The optimal size of the hole for max sharpness is in average 1/80-100 of focal length
Josef Petzval a donné une formule pour calculer la dimension optimale du trou pour optimiser le piqué et éviter la diffraction: d = 2 x √ (f x λ)
- d = diamètre du trou
- f = la distance focale = distance entre le trou et le capteur
- λ = la longue d’one de la lumière , 550nm en moyenne
ex. pour une focale de 11mm on a un trou optimum de 0,15mm
La taille optimale sera en moyenne entre 1/80 et 1/100 de la longueur focale
Quality of pinhole / Qualité du trou
For best results the hole need to be perfectly circular, in the most thin material as possible
Vignetting can occur if the size of the hole approach the thickness of the material as the hole only let enter the light at 90° and border are less exposed, so the material punched by the hole need to be as thin as possible
Pour de meilleures résultats le trou doit être parfaitement circulaire et dans le matériel le plus fin possible
Plus le matériau est épais plus il y a de vignettage à cause d’un effet tunnel , la lumière ne pouvant alors rentrer que perpendiculairement à la surface, les bords du capteur sont alors moins exposé, la surface doit donc être aussi fine que possible tout en restant résistante
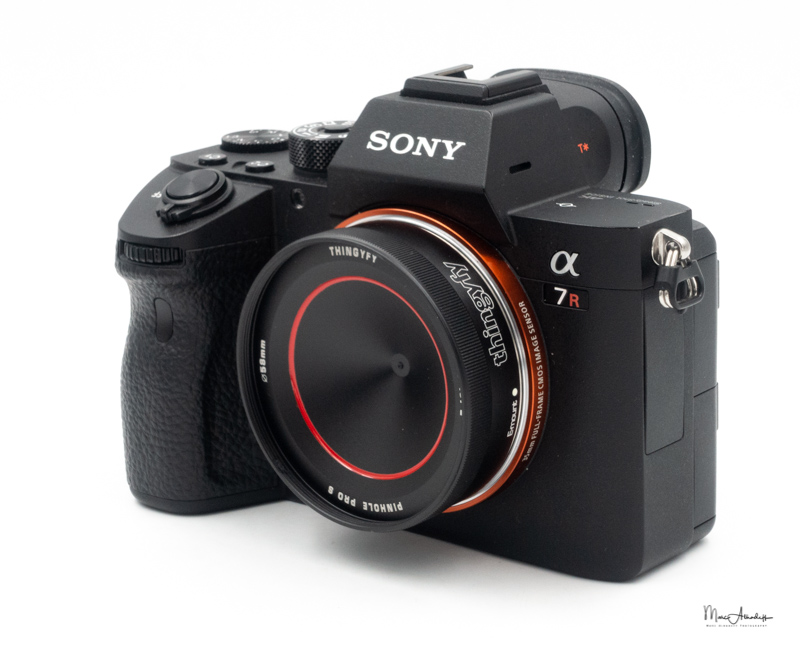
1.2 Specifications
- Weight : 46g
- Price : 69 euros
- Length : 18,1mm
- Focal length : 11mm
- Filter : 59mm
- Aperture/hole size : 0.14mm
- Aperture equivalent F73
- Field of view : 120°
There are no control , no aperture , no focusing ring. We just have the lens with its hole and a lens front cap and lens back cap
Worth to note there is a filter thread of 59mm to be able to mount a protection filter to avoid dust enter into the camera and goes to the sensor
The build quality is good and the look is nice with a red circle


- Poids : 46g
- Prix : 69 euros
- Longueur : 18,1mm
- Focale : 11mm
- Filtre : 59mm
- Taille du trou : 0,14mm
- Ouverture équivalente : F73
- Angle de vue : 120°
Il n’y a aucun contrôle, réglage d’ouverture ou de mise au point. L’objectif est livré avec un capuchon d’objectif et un cache arrière
A noter qu’il y a la possibilité de monter un filtre de 59mm pour empêcher la poussière de pénétrer par le trou de l’objectif
La qualité de construction est bonne , l’objectif très compact et discret avec un beau petit liseré rouge qui sort de l’ordinaire

1.3 Usability / Usage
By design , there is no focusing and depth of field is infinite , you just need to take care of framing, but this is note so obvious with a F stop so small
As you will see from below video , the visor is extremely dark and you should use the “bright monitoring” function available on Sony 3rd gen camera to boost the brightness of the visor (“live view display” is set automatically to off during this function) and allow you to see in the “dark”, allowing you to frame your shoot
This function is only available if you assign it to a custom key
De par sa conception , un sténopé n’a pas de mise au point et la profondeur de champ obtenue est infinie, on n’a a s’occuper que du cadrage, ce qui s’avère en pratique souvent un vrai défi vu l’ouverture de l’objectif (F73) et le très peu de lumière qui atteint le capteur
Comme vous pouvez le constatez dans la vidéo ci dessous , le viseur est extrêmement sombre et la seule manière de voir ce que l’on fait est d’activer la fonction “vérification lumineuse” ou “Bright monitoring” en anglais (dispo depuis les boitiers de 3ème génération). Celle ci pousse la luminosité du viseur au maximum et permet de voir clair en pleine nuit pour mieux cadrer
Cette fonction est uniquement disponible si l’on assigne à un bouton personalisable
2 Optical performances / Performances optiques
2.1 Sharpness / Piqué
- For a pinhole the Pinhole Pro S is decently “sharp” more than the Pinhole pro that has a variable hole size and a quite blurry image
- Pour un sténopé , les résultats sont tout a fait honorables et l’image est relativement nette , plus qu’avec le Thingyfy Pro qui a un trou variable et souvent trop grand avec une image très floue

2.1 Exposure time / Temps d’exposition
- Typical ISO /speed are :
- ISO 25600 – 5 second indoor with light in the room.
- ISO 6400 1/30 in plain sun !
- Les couples ISO/vitesse typiques sont
- ISO 25600 , 5s pour une photo intérieure dans une pièce bien éclairée
- ISO 6400 1/30 sec pour une photo en plein soleil !
2.2 Vignetting / chromatic aberrations / distorsion / flare / bokeh
- Vignetting is visible
- No Distorsion , by design it is a projection without deformation
- No CA
- Résistance to Flare is zero
2.2 Vignettage / aberrations chromatiques / distorsion / flare
- Le vignettage est visible
- Les aberrations chromatiques sont nulles
- La distorsion est nulle , de par la conception même du sténopé qui donne une projection sans déformation
- La résistance au flare égale à zéro


2.3 Bokeh / Color Rendition – Bokeh / Rendu des Couleurs
- All is “in focus” with an infinite depth of field
- No Bokeh or background blur by design
- Color rendition is “vintage” and quite saturated
- Tout est net avec une profondeur de champ infini par design
- Pas de bokeh ou de flou d’arrière plan par design
- Le rendu des couleur est vintage et très saturé


3 Video
For video , pay attention to have a lot of light and shoot at extreme high ISO to be able to have something usable
Pour la vidéo il faudra grimper très haut dans les ISO et s’assurer d’avoir beaucoup de lumière
4 Samples of Photos / Exemples de Photos
Here are some samples photos. A Black & Wide post treatment is often well suited for this kind of photos
Voici quelques exemples des effets obtenus, un post traitement noir et blanc va souvent bien pour ce genre de photos


5 Conclusion
For 80 euros the Thingyfy Pinhole pro S give a wide angle pinhole that delivers consistent and decent results
By design , there is no focusing and depth of field is infinite , you just need to take care of framing, but this is not so obvious as with a tiny hole the F stop si extremely small (F73) and there is not a lot of light hitting the sensor
Using it is quite fun and you can produce very old school vintage photo. Both colors and Black and white works nicely
With the extremely low aperture linked to a 0.14mm hole (= F73) you need a lot of sun to shoot handled and ISO is going high to extremely high and speed quite low (Sony SteadyShot stabilization will help here)
Shooting on tripod with long exposure can also be a solution
For the usage on the field , with standard settings, the visor will be often very dark and you should assign the “Bright Monitoring” function to one custom button to be able to frame and shoot at ease. This one will boost your screen and allow to “see in the dark”
It is recommended to add a protection filter on the pinhole thanks to the filter thread , this will avoid some dust hit the sensor through the hole
Alternatives
- Thingyfy Pinhole Pro S : 11mm = this lens
- Thingyfy Pinhole Pro with variable hole size and 26mm equivalent
- ThingyfyPinhole Pro X : currently on Kickstarter and that offer a 18-36mm zoom!
- Do it yourself
All are quite cheap (<80 euros) so if you want to have fun or produce different kind of photos it is worth a try
From the 2 Thingyfy currently available the Pro S (= subject of this review) is the one giving the “sharpest” image
Of course you could also take a Sony Mount cap and drill a small hole in it , but the plastic is not very thin, your hole will be too big (unless you use a laser) and not very regular, and you won’t have a filter thread to add a protection filter to avoid dust reaching the sensor
Have fun…
5 Conclusion
Pour 80 euros le Thingyfy Pro S fournit un sténopé grand angle qui délivre des résultats consistent et décents
De par sa conception , un sténopé n’a pas de mise au point et la profondeur de champ obtenue est infinie, on ne doit s’occuper que du cadrage, ce qui s’avère en pratique souvent un vrai défi vu l’ouverture de l’objectif (F73) et le très peu de lumière qui atteint le capteur
On s’amuse beaucoup à l’usage avec cet “objectif” et les photos produites sont uniques. Les rendus couleurs et noir blanc fonctionnent bien
Avec une ouverture aussi faible (trou de 0,14mm / F73) , soyez prêt à monter dans les ISO et à utiliser des vitesses lentes (vive la stabilisation du capteur !)
La prise de vue sur trépied et des poses longues est une autre possibilité
Sur le terrain , la visée sera très sombre dans la plupart des cas et il faudra faire appel à la fonction “vérification lumineuse” ou “bright monitoring” à assigner à un bouton personnalisable et qui vous permettra de cadrer. Cette fonction permet littéralement de voir dans le noir.
Il est également recommandé d’ajouter un filtre de protection pour éviter que de la poussière passe par le trou et contamine le capteur
Alternatives
- Thingyfy Pinhole Pro S : 11mm = cette optique
- Thingyfy Pinhole Pro avec ouverture/trou de diamètre variable, focale de 26mm
- Thingyfy Pinhole Pro X : actuellement sur Kickstarter et qui offre un zoom 18-36mm
- Fabrication maison
Tous sont bon marché (<80 euro) et si vous voulez vous amusez et essayer quelque chose de différent cela vaut la peine d’essayer
Des deux Thingyfy actuellement dispo, c’est le Pro S (= celui de cet article) qui donne le résultat le plus net
Bien entendu on peut en fabriquer un, en perçant un petit trou dans un bouchon de boitier, mais celui ci ne sera pas dans un matériau fin , le trou sera trop grand (à moins d’utiliser un laser” et pas très régulier, de plus vous n’aurez pas la possibilité de rajouter un filtre pour protéger le capteur des poussières
Bon amusement

Leave a Reply