


in Blue English / en noir en Français
- Introduction to Focus stacking
- MVE Automated focus stacking rail
- Conclusion
1 Introduction
1.1 Focus stacking
When you do macro at 1:1 on small objets / insects , the focus stacking technique is almost mandatory as the depth of field of a single shoot is ridiculously small
This technique consisting in taking a large number of photos with a slight move forward in between each photos and to merge them in post processing to increase the depth of field.
To get photos perfectly aligned a macro rail is almost mandatory, it allows to move forward your camera by very small increment , in a perfectly controlled way and to take a shoot between each step
- The increment must be as small as possible when you use magnification ratio > 1:1 indeed the depth of field is so thin at e.g. 2:1 that it is not even reaching .1mm.
- Each photo capture e.g 0.1mm depth of field and by taking 100 photos and stacking them in post processing you can reach 10mm depth of field
For more info on the post processing stacking technique you can see a sample in my article here, chapter 4.2
Lors de la pratique de la macro à des rapports 1:1 ou supérieur sur des insectes ou des petits objets , la technique de focus stacking (empilement de mise au point) est indispensable car la profondeur de champ d’une seule prise de vue est ridiculement faible
Cette technique consiste a prendre un grand nombre de prise de vues en s’avançant de très petit pas entre chaque prise et de fusionner l’ensemble des photos prises en post traitement pour accroitre la profondeur de champ
Pour avoir des photos parfaitement alignées , un rail macro est indispensable , il permet d’avancer votre boitier par tout petit pas réguliers et de prendre une photo entre chaque pas
- Les pas doivent être le plus petit possible pour des rapports > 1:1 avec certaines optiques qui atteignent des rapports 2:1 ou 5:1 la profondeur de champ est souvent < 0,1mm
- Si l’on veut photographier un insecte qui fait 10mm , il faudra empiler plus de 100 photos avec une profondeur de champ de 0,1mm / photo
Pour plus d’info sur la technique de stacking voir aussi le chapitre 4.2 de mon article ici,
1.2 Macro Rails / Rails macro
There are 2 families of macro rails
- Manuals ones : between 100-200 euros , the precision is relative and linked to your precision and patience. The process is long and tedious
- Automated ones (200-800 euros) : equipped with a motor where you can choose the step increments and number of steps and delay between 2 shoots. They automatically then take the shoots : those are much more precise & you gain a lot of time
If you do macro only from time to time or stay with 1:2 ratio then a manual rail is ok , but if you do it regularly or own some of the extreme macro lenses then an automated rail is a must
There are mainly 3 automated rails that exist for Sony cameras
- MVE (Murzin Video Equipment) : 200 euros , tested in this article, with rail, command unit with screen
- WeMacro rail : 300 euros (tested here) , with a rail, a command unit without screen that you manage either with a smartphone or a computer (Windows or Mac OS)
- Cognisys Stackshot Rail : 600-800 euros The Rolls Royce of automated macro rails with a user friendly commander unit that can also be managed with a computer
If you are looking for a manual solution I have tested the very good Leofoto MP-150 Macro rail (180 euros)
Il y a deux familles de rails macro
- Les Manuels : entre 100 et 200 euros, leur precision est relative et fonction de votre patience et régularité. Le procédé est très long et peu passionnant…
- Les Automatiques (200-800 euros) , ils sont équipés d’un moteur qui permet de programmer la taille et le nombre de pas à réaliser entre 2 prises de vues ainsi que le délai entre deux prises. Une fois programmé les photos sont prises automatiquement. Le processus est beaucoup plus précis, régulier et plus rapide
Pour de la macro occasionnelle ou a des rapport 1:2 , un rail manuel est suffisant , mais pour une utilisation régulière ou des rapports 1:1 et supérieur un rail automatique est fortement recommandé
Il existe à ma connaissance 3 solutions automatiques pour les boitiers Sony
- MVE (Murzin Video Equipment) : 200 euros , le sujet de cet article avec rail et unité de commande avec écran
- WeMacro rail : 300 euros (testé ici) avec un rail et une unité de commande sans écran qui se pilote exclusivement à partir d’un ordinateur ou d’un smartphone
- Cognisys Stackshot Rail : 600-800 euros, La Rolls Royce des rails automatisés avec une unité de commande ergonomique et des possibilités de commande via ordinateur
Si vous recherchez une solution manuelle je vous recommande le Leofoto MP-150 Macro rail (180 euros), que j’ai testé
1.3 Post processing
When you have done your 50-200 shoots , you need to assemble them, 3 main softwares exist to do that
- Photoshop but the process consumes a lot of ressources and you often runs out of memory or need to wait 1 hour or more
- Helicon focus
- Zerene Stacking
Quand vous avez vos 50 à 200 photos à assembler il y a 3 principaux logiciels que vous pouvez utiliser
- Photoshop mais le processus est long (près d’une heure) et consomme énormément de resources
- Helicon focus
- Zerene Stacking
1.4 Macro lenses for Sony E mount / Optiques macro en monture E
The choice of macro lenses is very large : Among the most popular ones the Sony FE 90 f2.8 Macro G OSS is a must have for standard macro and Laowa lenses has a extended offering of specialized macro lenses that goes up to 5:1 ratio
Le choix en termes d’optique macro est très large en monture E : Le Sony FE 90 f2.8 Macro G OSS est sans doute l’optique la plus populaire avec la gamme très étendues des optique Macro Laowa qui proposent des optiques jusqu’au rapport 5:1
Full frame
- Sony FE 90 f2.8 Macro G OSS
- Voigtländer 110mm F2.5 Macro Apo Lanthar
- Laowa 100mm F2.8 Macro
- Laowa 60mm f/2.8 2:1 Ultra-Macro
- Laowa 25mm f/2.8 2.5-5x Macro
- Laowa 15mm F4 Macro 1:1
- Laowa 24mm F14 Probe
- Tokina Firin 100mm F2.8 Macro
- Sigma 70mm F/2.8 DG Macro Art
- Voigtländer 65mm F2 Macro Apo Lanthar
- Sony FE50mm F2.8 Macro
- Mitakon 20mm F2 4.5x Supermacro
APS-C
- Yasuhara Nanoha X5
- Laowa CF 65mm F2.8 CA – Dreamer Macro 2X
- 7Artisans 60mm F2.8 Macro
- Sony E 30mm F3.5 Macro
- Zeiss Touit 50mm F2.8 Macro
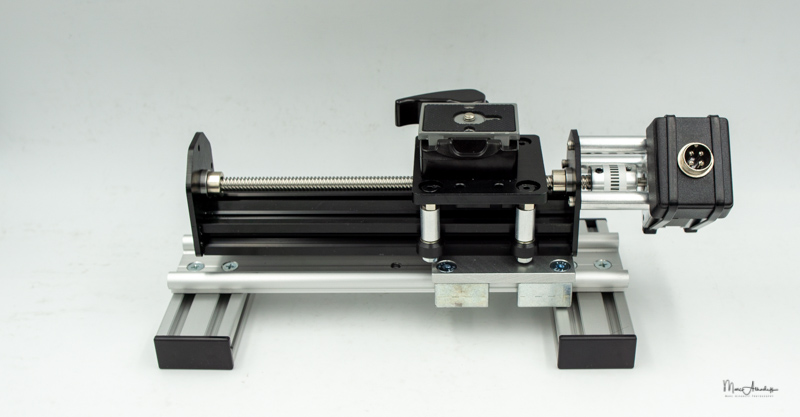
2 MVE Automated focus stacking rail
2.1 Specifications
- 3 versions
- Standard up to 0.025mm step : 200 euros
- With quick focusing rail : 225 euros
- Advanced up to 0.005m (5microns) : 250 euros
- Weight :
- 1534g rail,
- 477g command unit,
- 227g cables
- Total = 2238g
- Dimensions : 28cm length x 12cm width x 12,5cm height
- Minimum step : 0,025mm / Max 3mm
- Functions : Focus stacking / Timelapse / Sliding
- Adjustable number of exposure / delay / speed
- Manfrotto PL plate
- 1/4″ + 3/8″ fixation hole
- 160mm rail length
- Maximum travel 45 or 90 mm
- Sony S2 cable (micro USB)
- Extension cable (2m)
- AC adaptor or cable to attach to 12V battery
Globally the whole set is quite bulky and heavy, it is well built and is very sturdy
- The set is composed of the rail to be fixed on a quick release plate via a 1/4″ hole and 3/8″ (I would have liked to get 2 holes to fix it on a large Arca Swiss compatible plate)
- A command unit to be linked to the rail
- A S2 cable that you fix on the command unit (you can use an extension cable that is provided) and on the camera
- An AC adapter or cable to connect to a 12V battery

- 3 versions
- standard – précision de 0,025mm : 200 euros
- avec rail de mise au point rapide : 225 euros
- haute précision : 0,005mm = 5 microns : 250 euros
- Poids:
- 1534g rail,
- 477g unité de commande,
- 227g cables
- Total = 2238g
- Dimensions : 28cm longueur x 12cm largeur x 12,5cm hauteur
- Pas minimum : 0,025mm / Max 3mm
- Functions : Focus stacking / Timelapse / Sliding
- Choix du nombre de déclenchements, du pas et de la vitesse
- Plateau Manfrotto PL
- Fixation vis 1/4″et 3/8″
- Longueur du rail : 160mm
- Distance de travail 45 or 90 mm
- Câble Sony S2 (micro USB)
- Câble d’extension 2m
- Adaptateur secteur + cables pour batterie 12V
Globalement l’ensemble est encombrant et lourd , il est construit comme un tank et est très solide
- Le kit est composé d’un rail qui peut être fixé sur un plateau rapide via un emplacement 1/4″ ou directement sur un trépied via la vis 3/8″ (J’aurai amié avoir deux trous pour le fixer sur un grand plateau compatible Arca Swiss)
- Une unité de commande qui doit être relié au rail
- Un cable S2 qui relie le boitier Sony (entrée micro USB) au module de commande (un cable d’extension de 2m est aussi fourni)
- Un adaptateur secteur et des cables pour le relier à une éventuelle batterie 12V


2.1 Basic Operations / Fonctions de bases
- Put the camera on the Manfrotto plate, fix it on the rail
- Connect the S2 cable to the camera and the command unit
- Connect command unit to rail and AC adapter or the 12 V battery
- By default the commander will execute step of 0,025mm (it can be changed to 0,05 if needed)
- Choose program : Timelapse stacking
- Run = number of steps for each run – 1 = 0,025mm , 2 = 0,05mm
- Speed if speed = 1 then a run of 1 = 0,025mm if speed = 400 then run of 1 = 0,125mm (not very obvious see configuration table below)
- Stop : choose number of second to stop in between 2 shoots , take at least 1 second more than the exposure time you are setting on the camera e.g. 1/15sec on the camera take a stop of 1 or 2 sec
- Number of exposures : Take the size of the object you need to capture e.g. 10mm , divided by the steps e.g. 0,025mm = number of steps 10 / 0,025 = 400 exposures
- Press Start : after each step a capture will be taken
- At the end you have the choice to go back to the start position if you want to retake a series with other settings

- Fixer le boitier sur la plaque Manfrotto et fixer l’ensemble sur le rail
- Connecter le cable S2 au boitier et au module de commande
- Connecter le rail au module de commande, brancher l’adaptateur secteur ou la batterie 12V
- Par défaut le module exécute des pas de 0,025mm (on peut changer ce défaut à 0,05mm)
- Choisir son programme : Timelapse stacking
- Run = multiple du nombres de pas par défaut à executer – 1 = 0,025mm , 2 = 0,05mm
- Speed, si la vitesse est sur 1 , Run 1 = 0,025mm, si la vitesse est réglé sur 400 , alors Run 1 =0,125mm (pas très intuitif – voir tableau de configuration ci dessous)
- Stop : choisissez le nombre de secondes de pause entre 2 prises de vues, ajouter une seconde au temps de pose. Ex pour une pose de 1/15sec prendre 1 ou 2 sec de pause entre chaque déclenchement
- Nombres de déclenchements : Prendre la taille de l’objet et diviser par le pas choisi : ex un objet de 10mm avec un pas de 0,025 = 400 déclenchements !
- Appuyez sur Start et le boitier commence à prendre les photos automatiquement
- A la fin vous avez le choix de retourner à la position de départ pour reprendre un série avec d’autres réglages si necessaire

2.2 Configuration
By default the Commander is set to 0,025mm step but if you open it you can set it to 0,05mm (see below picture)
Par défaut on a un réglage sur des pas de 0,025mm mais en ouvrant le module de command eon peut le régler sur 0,05mm

To configure the step you want to use on the rail you need to set up a combination of the RUN and SPEED parameter as per below table
Pour configurer le pas lors du fonctionnement du rail on doit utiliser une combinaison des paramètres RUN et SPEED en suivant le tableau ci-dessous
0,025mm Config
| SETTINGS MM STEP | RUN/SECONDS | RAIL SPEED |
| 0,025 | 1 | 1 |
| 0,05 | 2 | 1 |
| 0,075 | 3 | 1 |
| 0,1 | 4 | 1 |
| 0,125 | 1 | 400 |
| 0,25 | 2 | 400 |
| 0,5 | 4 | 400 |
| 0,75 | 6 | 400 |
| 1 | 8 | 400 |
| 1,5 | 12 | 400 |
| 2 | 16 | 400 |
0,05mm config
| SETTINGS MM STEP | RUN/SECONDS | RAIL SPEED |
| 0,05 | 1 | 1 |
| 0,075 | 2 | 1 |
| 0,1 | 3 | 1 |
| 0,125 | 4 | 1 |
| 0,25 | 1 | 400 |
| 0,5 | 2 | 400 |
| 0,75 | 3 | 400 |
| 1 | 4 | 400 |
| 1,5 | 6 | 400 |
| 2 | 8 | 400 |
| 3 | 16 | 400 |
2.3 In use / Utilisation
Once setup the rail operates fully automatically , you only hear the click of the shutter.
I took the below flower with the Voigtländer 110mm F2.5 Macro Apo Lanthar, I setup a run of 4 , speed 1 resulting in a step of 0,1mm and I setup 100 exposures to get 10mm depth of field, I setup a stop of 1 second for 1/60s F8 ISO 100,
In less than 2 min I had my full series of photos instead of 30 min with a manual macro rail !
I further did the stacking with photoshop (took 1 hour) and with Helicon Focus Software to compare (took 1 minute)

Une fois le paramétrage effectué et l’appui sur START , le rail démarre et prend les photos à intervalle régulier de manière automatique
Pour le test j’ai pris la fleur ci-dessous en photo avec le Voigtländer 110mm F2.5 Macro Apo Lanthar, avec un Run de 4 et une vitesse de 1 donc un pas de 0,1mm et j’ai paramétré 100 déclenchements pour avoir une profondeur de champ totale de 10mm. Les paramètres étant de 1/15s F8 ISO 100 , j’ai choisi une pause de 1 sec entre chaque déclenchement
En moins de 2 minutes j’avais mes 100 photos, contre plus de 30 min avec un rail manuel !
J’ai ensuite effectué l’assemblage avec Photoshop (plus de 1 heure) et avec Helicon Focus pour comparer (moins de 1 minute !)

3 Conclusion
The MVE Automated focus stacking rail (sold here on eBay) is a affordable and efficient solution that will save you enormous time vs manual macro rail.
3 main versions are sold on eBay
- Standard up to 0.025mm step : 200 euros
- With quick focusing rail : 225 euros
- Advanced up to 0.005m (5microns) : 250 euros
There is also a 4th version with XYZ axis (325-350 euros)
Once you tried it, you will never want to go back to manual rail !
Pros
- The solution is efficient and results are very good.
- The possibility to use it also on a battery is a plus when used outdoor
- Cheap vs competition
Average
- The set is bulky and heavy
- It lacks some ergonomics in term of command panel (you need to use a config table to set it up)
- No link to computer of smartphone
- No advanced function like multiple shoots for each steps (for bracketing)
- A dual hole 1/4″ (for plate) and 3/8″ (for tripod fixation) is available (3/8″ only on new 2020 models). A second hole (to avoid any possible twisting) and a Arca Swiss rail will have been excellent)
If you are an occasional macro shooter or on a budget , the MVE Automated stacking rail does all the basics and does it well
If you are a more regular macro user and if you budget allows it, you can look at Wemacro rail (300 euros) or Cognisys StackShoot rail (600-800 euros)
3 Conclusion
Le Rail automatisé MVE pour le focus stacking rail (vendu ici sur eBay) est une solution abordable et efficace qui vous permettra de ganger énormément de temps en macro
- 3 versions principales sont vendues sur eBay
- standard – précision de 0,025mm : 200 euros
- avec rail de mise au point rapide : 225 euros
- haute précision : 0,005mm = 5 microns : 250 euros
Il existe aussi une 4eme version avec axe XYZ (325-350 euros) !
Une fois essayé on revient difficilement vers un rail macro manuel
Pour
- Solution efficace avec de très bon résultats
- Possibility d’utiliser une batterie 12V si une source de courant n’est pas disponible
- Bon marché par rapport à la concurrence
Moyen
- Le kit est très encombrant et lourd
- Ergonomie est très basique qui nécessite d’avoir le tableau de correspondance RUN/SPEED sous la main pour la configuration
- Pas de lien possible vers un ordinateur ou un smartphone
- Pas de fonctions avancées comme une exposition multiple (bracketing) à chaque pas
- 1 trou compatible 1/4″ et 3/8″ pour une fixation sur plaque ou directement sur trépied (le summum aurait été 2 trous pour empêcher une rotation et un rail compatible Arca Swiss)
Si votre budget est limité ou que la pratique de la macro est occasionnelle, le rail automatisé MVE fait parfaitement le job sans fioritures et le fait bien
Si vous êtes un utilisateur régulier et que votre budget le permet alors vous pouvez envisager les solutions de Wemacro rail (300 euros) ou de Cognisys StackShoot rail (600-800 euros)
Categories: Accessories, Macro Rails
Nice in depth review. I just purchased one but am confused, when you say Take the size of the object you need to capture e.g. 10mm ,
Is that 10mm depth of the object? I cannot get my head around the wording in the remote.
If I have an insect I want to take say 100 photos with a step of 0,025 with a 1 second break between photos I get confused with run, speed, exp etc.
Yes 10mm is the depth in this case
yes wording with this rail is a bit confused but if you hav user guide wit you you can make it work
Thanks for the response Marc, where does the EXP come into play then as I get the depth divided by step to give you run speed 10mm / 0,025 = 400 but EXP is manual. Is EXP (exposure ) the amount of photos I want to shoot as I would expect to take over an hundred or so but when I set it up its averages about 15.
I understand you are not affiliated to the MVE producer of the rail but you seem to understand it better than I.
Good morning, what about using thi smacro rail with a Canon EOS70D for the shutter cable?
Regards,
Olivier
it will work with the right cable
Thanks for your réponse, but on eBay there is only choice between Sony and Minolta. I am waiting a response from eBay. If I asked you it was because you have possible expérience with other brand. I am surprised about thé limited choice.
Regard,
Olivier
From my mobile phone
Look at WemacroRail (test also on my blog) instead of MVE , not much more expensive and much better
Yes, I think it will be the solution.
Olivier
From my mobile phone.
Dear Marc, for your information I got a positive response for a Canon EOS 70D cable. As I am a very beginner, I prefer to limit the spent, so I ordered the MVE rail. If later I regurlay make photomacro, I will invest more. Anyway many thanks for your artcile, it helped me a lot and also thanks for your responses. I will come back to you if you want in some weeks when I will do my first amateur photos!
Regards
Olivier
Hey Marc, do you know if these guys still in business? I tried all sorts of things to find their website.
I don’t know, but I prefer the WeMacro Automatic rail by far
Hi Marc, I bought one of these in 2017 to use with a Canon 7D.
I have now changed to a Sony a7ii and would like to know if simply changing the Canon extension cable for a Sony S2 cable would be sufficient to get everything working as it should?
Many thanks and regards.
Graham
Yes it should